


Film Slides
Before Image

After Image

The objective of our first assignment in Raster Graphics was to fill a minimum of 25 empty slide frames and experience the importance of selection, inverse, layer management, canvas size and the text tool.
The required footer provided exposure to Image size vs Canvas size and how the megabytes of a file changes depending on resolution.
The file of empty slide frames was provided by the instructor. I had the freedom to use my own images to fill the frames. All of the frame images were captured by me.
Key Objectives and Photoshop Features
-
Image size
-
Canvas size
-
Text tool
-
Rectangle tool
-
Paint bucket tool
-
Layer naming and management
-
Importing images into Photoshop
-
Scaling images in PROPORTION
-
Sizing an image based on specifications
-
Free transform feature
-
Selection tools (polygon lasso)
-
Inverse selection
All images were taken/created my me, Bret Johnson.
Layer Modes
Layer Modes

Layer Styles

The objective of this assignment in Raster Graphics was to explore the different layer options and what the different effects did to an image.
The text styles was used to explore the different available options one could manipulate text with the give options.
Key Objectives and Photoshop Features
-
Create a new canvas in Photoshop
-
Acquire images free of copyright restrictions
-
Implement Layer management
-
Add images in the new canvas
-
Use the “option + drag” duplicate feature to create a grid of images
-
Scale images
-
Create and duplicate text boxes
-
Edit text
-
Apply layer modes
-
Manage layer visibility
-
Apply layer effects
-
Adjust layer effects settings
-
Save the file in the designated file format
-
Apply the required file naming structure
-
Submit multiple, appropriate files to Canvas
-
Submit a copyright statement based on course criteria
All images were acquired from the STOCK IMAGES server with permission to use.
Pixel Basics
Print Sizes
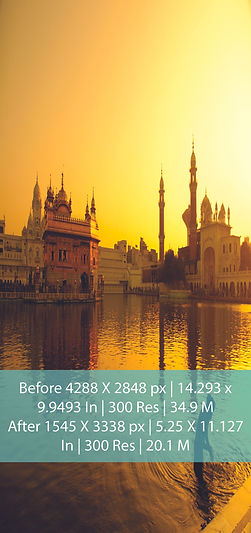


The objective of this assignment in Raster Graphics was to manipulate image to fit industry standard dimensions and learn what those standards are along with their importance.
Learning that images will print different if not formatted or saved correctly, difference between RBG and CMY, and tiff files.
Key Objectives and Photoshop Features
-
Launch Photoshop and log in
-
Open the four images you plan to use for the assignment
-
Create a new canvas that matches the required image dimensions using the Print parameters
-
Drag your original image to the new canvas
-
Scale the image in proportion to fit the canvas size
-
Add a text footer to the image that includes the before/after required information
-
Save the file in the designated file format
-
Apply the required file naming structure
-
Submit multiple, appropriate files to Canvas
All images were acquired from the STOCK IMAGES server with permission to use.
Selection Images
Selection Images Part 1

Selection Images Part 2
.jpg)
The objective of this assignment in Raster Graphics was to explore the variety of selections tools in different situations and learn which to use with images given.
Moving forward, learning basic tools to manipulate the selected images to fill in with a solid color then opacity and other layer effects to create a new image.
Key Objectives and Photoshop Features
-
Manage layer groups
-
Manage layer visibility
-
Apply the Magic Wand tool for selection
-
Apply the Quick Selection tool for selection
-
Manipulate the brush size to make a precise selection
-
Apply the Object Select tool for selection
-
Apply the Pen Tool to create a path
-
Use the Paths panel to convert the path to a selection
-
Inverse selection
-
Apply Paint Bucket tool
-
Import .ase swatches
-
Add color swatches based on color codes (hex, RGB formulas)
-
Delete background
-
Add layers
-
Delete layers
-
Save in appropriate file format and using file naming structure
-
Submit files to Canvas
All images were given to use by the Instructor with permission to use.
Environmental Changes
Before Images


After Images
.jpg)
.jpg)
The objective of this assignment in Raster Graphics was to explore the variety of selection, removal based, and clone stamp tools in different environmental images to come about a desired out come.
Learning to make it look natural and not make mistakes for "copy pasted" irregular, clearly photoshopped images.
Key Objectives and Photoshop Features
-
Open a file in Photoshop
-
Manipulate the canvas size
-
Organize and rename layers
-
Use appropriate selection tools
-
Scale images in proportion
-
Select specific pixels
-
Utilize the Clone Stamp tool
-
Utilize the Content Aware Fill feature
-
Apply the Sky Replacement feature
-
Utilize the appropriate tools to execute the desired effect
-
Save in appropriate file format and using file naming structure
-
Submit files to Canvas with a valid copyright statement
-
Upload to Canvas
All images were given to use by the Instructor with permission to use.
Photoshop Actions


The objective of this assignment in Raster Graphics was to explore the action tool in photoshop and the various ways it could be used.
Key Objectives and Photoshop Features
-
Open the Actions panel
-
Load a set of Actions
-
Apply uploaded Actions to an image
-
Create a set of new Actions
All images were acquired from the STOCK IMAGES server with permission to use.
Google Ad Campaign


The objective of this assignment in Raster Graphics was to build a successful Google Image Ad campaign, based on Google identified standard specifications.
Key Objectives and Photoshop Features
-
Adhere to Google Ad dimensions
-
Create an ad campaign
-
Use various tools to match example adds
Images were acquired from Unslplash.com. Photo by Manuel Meurisse on Unsplash.
Surreal
Before Images


After Images


The objective of this assignment in Raster Graphics was to explore the Puppet Warp feature, Liquify filter, and text warp tool to manipulate images into surreal versions of themselves.
Key Objectives and Photoshop Features
-
Open the Puppet Warp feature
-
Apply the Puppet Warp feature
-
Remove an image from the background
-
Open the Liquify filter
-
Apply the Liquify Face filter
-
Apply the Liquify > Forward Warp tool
-
Apply the Liquify > Bloat tool
-
Convert a text layer to a smart object
-
Apply the Liquify tools to manipulate text
All images where taken from Unsplash. Ahmed Saeed, Christopher Campbell, and Keith Lazarus.
Copy cat Magazine Ad
Before Image

After Image

The objective of this assignment in Raster Graphics was being able to match colors, fonts, typography, leading, kerning, logo placement, special effects, scale, proportion and many other features based on the ad chosen.
Key Objectives and Photoshop Features
-
Add 25 images as raster images
-
Organize and rename layers
-
Create a footer with required text
-
Use appropriate selection tools
-
Scale images in proportion
-
Rotate images
-
Select specific pixels
-
Apply “Inverse” selection
-
Delete designated pixels
Lady image was taken from Unsplash, Valerie Elash.
Product image was uploaded to product Miracle Beach Waves - Aussie and is licensed under the Creative Commons Attribution-Share Alike 3.0 Unported license. (Original Image)
Magazine Cover
Before Images

After Images

The objective of this assignment in Raster Graphics was to take what we learned from the selection tools and methods to make hair and fur overlay text as most commonly seen magazine covers do.
Key Objectives and Photoshop Features
-
Format typography
-
Import a barcode
-
Source images free of copyright restriction
-
Apply tool: Eraser
-
Apply tool: Clone Stamp
-
Apply feature: Content Aware
-
Apply filter: Liquify Face
-
Apply tool: Dodge (lighten an area - skin tone or hair)
-
Apply tool: Burn (darken an area - skin tone, lips or hair)
-
Apply tool: Blur & Smudge
-
Apply tool: Spot Healing Brush
-
Apply tool: Patch
-
Adjust brightness/contrast
-
Adjust hue/saturation/lightness
-
Apply Hair Selection techniques
Background image from unsplash, Muhaimin Mohd.
All other images by me, Bret Johnson.
Russell Brown
Before Images


After Image

The objective of this assignment in Raster Graphics was to take all that we learned and give Russel Brown a Hallow's Eve costume.
Key Objectives and Photoshop Features
-
Adjust color balance
-
Adjust hue/saturation
-
Adjust curves
-
Apply concepts from Surreal assignment
-
Apply concepts from Layer Modes assignment
-
Apply concepts from Filters assignment
-
Apply concepts from Selection assignment
-
Apply concepts from Environmental Change assignment
-
Apply concepts from Portrait Retouch
-
Apply hair selection techniques
-
Combine images
-
Apply Dodge/Burn tools
Images were acquired from instucture.
Sweeny Todd image taken from Fandom Wiki.
Tattoo Artist
Before Image
.jpg)
After Image

The objective of this assignment in Raster Graphics was to combine vector (Adobe Illustrator) images with a raster image.
Key Objectives and Photoshop Features
-
Import vector images into Photoshop as pixels
-
Apply Layer Modes assignment
-
Apply Transform tools: scale, perspective, skew, distort
-
Manage and organize layers
-
Adjust layer opacity and fill
-
Adjust image adjustments
-
Adjust image levels
-
Adjust image hue/saturation
-
Access OneDrive image library
-
Download zipped folders of multiple images
-
Open vector files in Illustrator
-
Copy/Paste vector files from Illustrator to Photoshop as pixels
-
Source images free of copyright restriction
-
Use appropriate selection tools
-
Scale images in proportion
-
Rotate images
-
Select specific pixels
-
Delete designated pixels
All tattoo images where taken from the Stock Image Server.
Man image taken from Unsplash, Aldi Permana.
Final Project
Before Images

After Image

The objective of this assignment in Raster Graphics was taking all that we learned to make a surreal image from existing image elements to make something new.
Key Objectives and Photoshop Features
-
Liquify
-
Scaling tool
-
Eraser tool
-
Rectangle Marquee Tool
-
Lasso Tool
-
Object selection Tool
-
Quick selection Tool
-
Text Tool
-
Blur Tool
-
Spot Healing Brush
-
Brush Tool
-
Difference Filter
-
Color Burn Filter
-
Clipping Mask
-
Transform Tool
-
Puppet Tool
-
Smudge Tool
-
Paint Bucket Tool
All images were taken from Unsplash.
Cat: Adél Grőber
Skull: Isi Parente
Wolf: Philipp Pilz
Ram: Dušan veverkolog
Brazen Deer Skull: Diane Picchiottino
Snake: David Clode
Car: Dan Gold
Smoking Man: Quinten de Graaf